
How to Capture a 3D Model Screenshot Online
Every 3D format GLBKit can open can be captured as an image. This guide covers loading formats other than GLB, the capture settings, and what to check when a model loads but will not render properly.

What a screenshot tool does and does not do
A screenshot tool captures what the renderer already produced. It does not re-render at higher quality, does not add detail your textures do not carry, and does not repair a model that loaded incorrectly. Once you understand that, the decisions reduce to three: what you want in frame, how you want it lit, and what pixel size and file format the result needs.
GLBKit's capture lives in the same workspace as the 3D Model Viewer, so every inspection and display tool is already available while you compose. The dedicated 3D Model Screenshot tool simply opens with the Screenshot panel selected rather than the empty viewer tab, which is the only difference between the two.
One consequence is worth stating plainly: because the capture reflects the viewport, any problem with the loaded model is baked into the image. A missing texture produces a screenshot of a missing texture. Checking the model first is cheaper than re-exporting later.
Step by step
Open the 3D Model Screenshot tool
GLBKit's 3D Model Screenshot page opens the workspace with the Screenshot panel selected, ready for a capture.
Load your model
Drop a file onto the canvas or use Browse Files. GLBKit accepts .glb, .gltf, .obj, .fbx, .stl, .ply, .pcd, .usd, .usda, .usdc, .usdz, .zip, .3mf, .dae, .x3d, .vrm, .off, .wrl, .vrml, .las, .laz, .step, .stp, .3ds, .x, and formats that reference external buffers, materials or images should be uploaded as a .zip so their references resolve.
Wait for parsing to finish
CAD, point cloud and archive files take longest because the browser parses and decompresses them before anything is drawn. CAD files are tessellated on load.
Frame the model
Left-drag orbits, the wheel zooms and right-drag pans. Use the Camera panel's 7 view presets and the Recenter Camera button when you want a repeatable angle.
Choose the capture settings
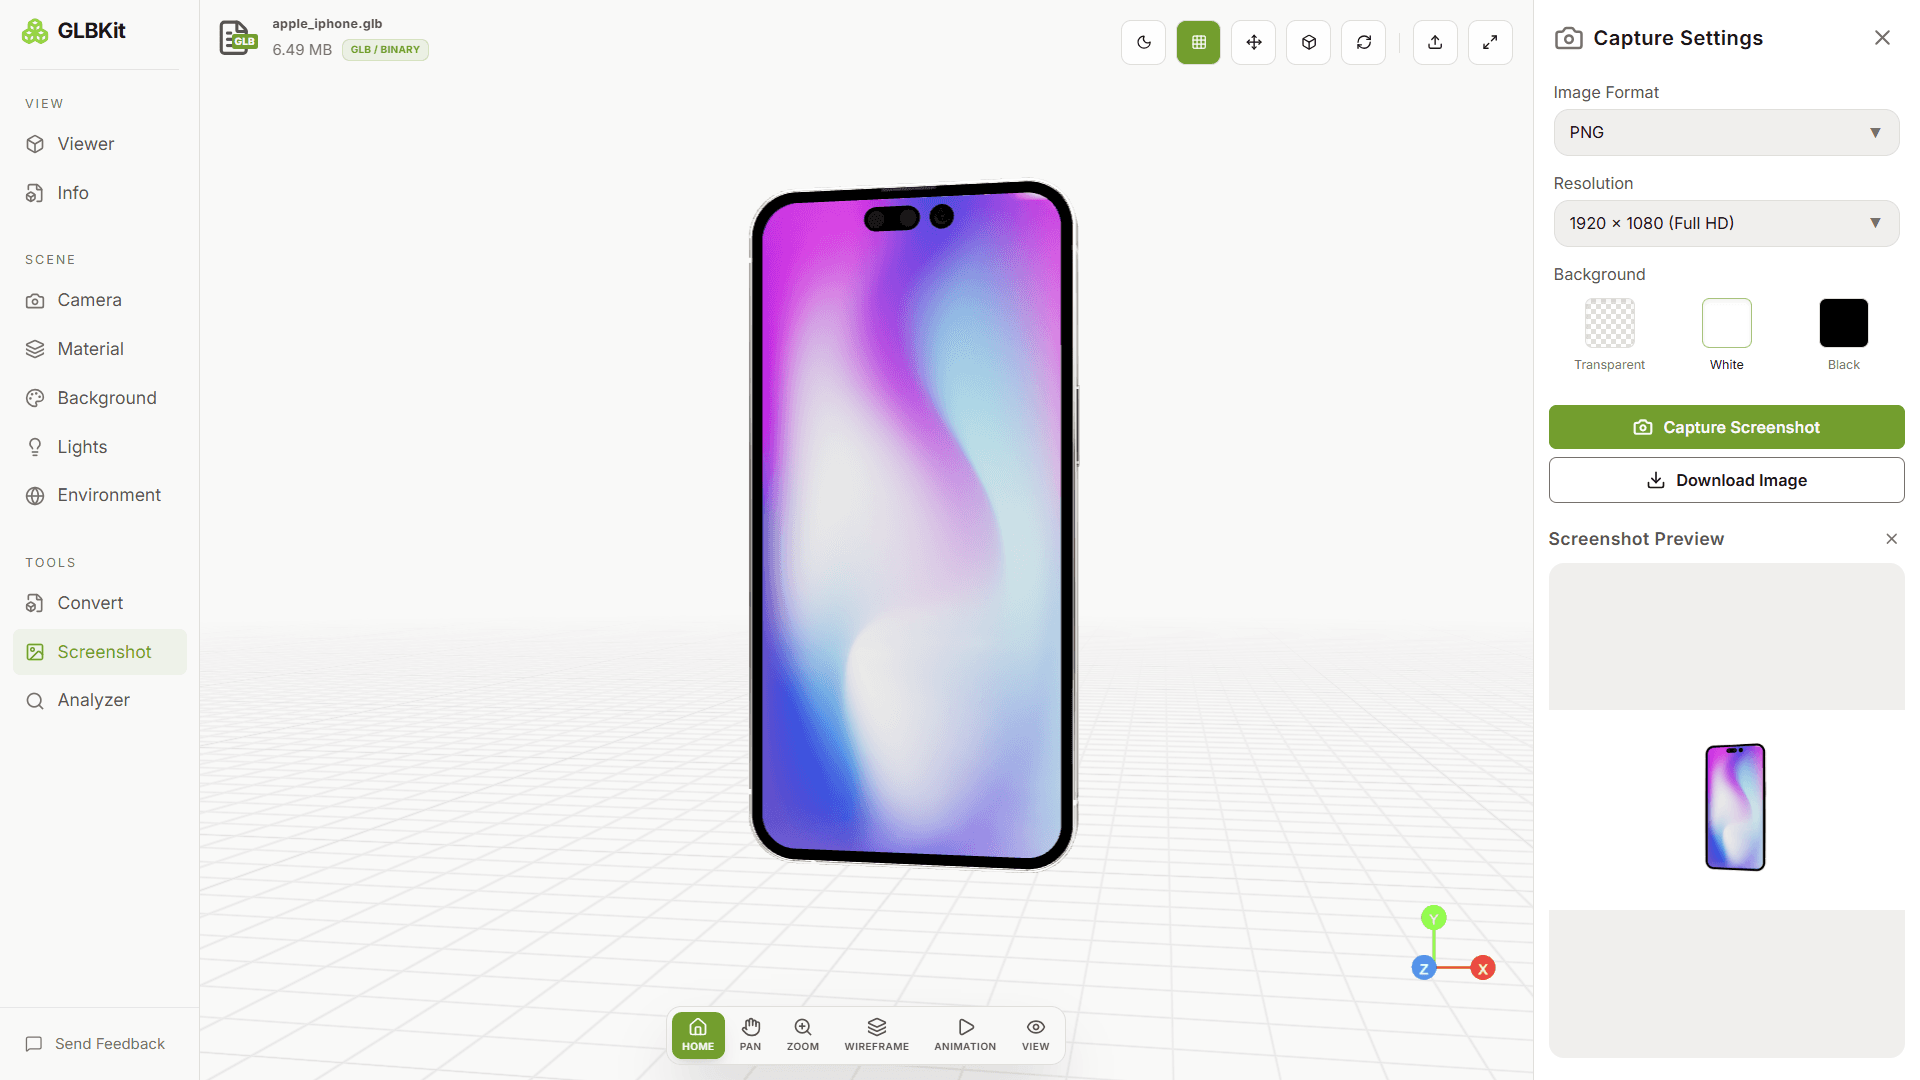
Set Image Format to PNG or JPEG, Resolution to one of 1280 × 720 (HD), 1920 × 1080 (Full HD), 3840 × 2160 (4K), and Background to transparent, white, black.
Capture and download
Click Capture Screenshot to fill the preview, then click Download Image to save it with a filename built from the model name, resolution and format.
Formats that arrive in pieces
GLBKit opens 25 extensions. Most are complete in a single file, but several describe a scene by pointing at other files, and those are the ones that produce a disappointing capture.
| Format | What it points at |
|---|---|
| .gltf | .bin buffer and external texture images |
| .obj | .mtl material library, then texture files |
| .dae | texture images referenced by COLLADA materials |
| .usd | referenced layers and payloads |
| .zip | whatever the archive contains |
When you upload only the manifest, the geometry still loads — the references simply resolve to nothing. You get a correctly shaped, flat-shaded model, which reads as a lighting problem and is not one. Uploading a .zip of the entire folder fixes it: GLBKit unpacks the archive in the browser, resolves the relative paths inside it and picks the first supported model as the scene.
If you want to inspect the loaded model before capturing it, use the 3D Model Viewer to check the scene, materials, textures and camera framing first.
What the capture settings control
The Screenshot panel holds the entire export configuration. Three settings, a capture button, a preview and a download.
| Setting | Options | Effect |
|---|---|---|
| Image Format | PNG, JPEG | PNG is lossless and carries alpha; JPEG is smaller and cannot. |
| Resolution | 1280 × 720 (HD), 1920 × 1080 (Full HD), 3840 × 2160 (4K) | Sets the output pixel dimensions independently of your screen. |
| Background | Transparent, White, Black | Replaces the viewport backdrop in the exported image only. |
Background is separate from the scene backdrop
The Background panel sets what you see behind the model while you work. The Background setting here determines what the exported image contains. They are independent, and this one wins for the file you download. Transparent with PNG is the combination that produces a cut-out image.
PNG or JPEG is a decision about the destination
PNG stores every pixel exactly as rendered and supports an alpha channel, so it is the correct choice for anything that has to composite over another background or needs to stay sharp: product cut-outs, layered mockups, prints, and any image you will edit again. Its files are large, and a 4K capture can be tens of megabytes.
JPEG compresses with lossy artefacts and has no alpha channel at all. It suits images that will only ever be looked at: a blog embed, a gallery thumbnail, a review of a model on a page. The artefacts show worst on smooth gradients, which is exactly what the Gradient background produces, so expect banding and ringing on a gradient backdrop at low quality.
One practical consequence: choosing JPEG while the Background is Transparent gives you a fully opaque image, because there is nowhere to store the transparency. Set the background to White or Black instead and you get the same look baked into the file.
Resolution sets size, not sharpness
The resolution dropdown chooses output dimensions. It cannot add detail the source did not have — a low-resolution texture stays soft at 4K. The Textures section of the Info panel lists each texture's pixel dimensions, which is the honest way to decide what resolution is worth capturing at.
If you need to inspect texture dimensions, materials or scene information before capturing, the 3D Model Analyzer provides geometry, materials, textures, memory and bounds information alongside the model.
Lighting before you capture
GLBKit's Lights panel provides a three-point setup: Key, Fill, Rim. Intensity runs 0 to 5, each light is positioned on X, Y and Z axes, and shadows are off by default.
Shadows being off is the single most common reason a capture looks flat. Three lights at similar intensity give even, shadowless illumination that reveals shape poorly. Enabling shadows on the key light is usually the fastest improvement available.
For a technical or inspection capture rather than a presentation one, the opposite applies: flat, shadowless lighting with an Orthographic camera is often more legible, because it shows proportions without perspective distortion.
For more detailed camera and lighting control, the How to Use a 3D Model Viewer guide explains the Camera, Lights, Environment and viewport controls used during composition.
Before you capture: check the model first
A short pre-flight check catches almost every bad capture.
| Check | Where | What a problem looks like |
|---|---|---|
| All textures present | Info panel, Textures section | Textures listed but the model is flat-shaded |
| Materials present | Info panel, Materials section | Uniform grey surface regardless of lighting |
| Expected mesh count | Info panel, Meshes section | Fewer meshes than expected — some parts missing |
| Animation clips | Info panel, Animations section | Empty when the asset was supposed to animate |
| Triangle budget | Analyzer panel, Geometry section | A far higher count than intended, hurting viewport responsiveness |
| Bounds | Analyzer panel, Bounds section | A dimension far larger than the object, indicating stray geometry |
The Bounds check is worth expanding on. An asset with a stray vertex parked far from the model will have a bounding box enormous relative to the visible object, which means Recentering frames mostly empty space and the model ends up small and off-centre in every capture. The Bounding Box toggle in the top-right toolbar makes the problem visible directly.
For a complete pre-capture inspection, open the 3D Model Analyzer and check the geometry, materials, textures and bounds before spending time composing the final image.
What the captures are actually for
The settings you choose follow from what the image is for. Picking the format and background before you compose saves redoing the shot.
| If you need | Format | Background | Resolution |
|---|---|---|---|
| A cut-out to place over a design | PNG | Transparent | Match the source texture size |
| A catalogue or store listing image | PNG | White or a light preset | 1280 × 720 to 1920 × 1080 |
| A blog post or documentation embed | JPEG | White, Black or Slate | 1280 × 720 |
| A full-screen hero or presentation slide | PNG | White, Black or Gradient | 3840 × 2160 |
| A reference image for a bug report | PNG | Solid, matching the app | 1280 × 720 |
For a bug report, matching the application's own settings is more useful than looking polished. A screenshot with a different background and lighting makes it harder for someone to tell whether what you are reporting is a defect or just an unusual setup.
Once the model is ready, open the 3D Model Screenshot tool to compose the camera, background and lighting and capture the final image directly in your browser.
FAQ
Which formats can I capture?
Any format the GLBKit viewer can open: .glb, .gltf, .obj, .fbx, .stl, .ply, .pcd, .usd, .usda, .usdc, .usdz, .zip, .3mf, .dae, .x3d, .vrm, .off, .wrl, .vrml, .las, .laz, .step, .stp, .3ds, .x. Formats that point at external files — glTF, OBJ, COLLADA and USD in particular — need to be uploaded as a .zip containing the whole folder, otherwise the capture will show geometry with no textures.
What is the difference between this and the GLB Screenshot tool?
The GLB Screenshot tool is aimed at single-file GLB models, where there are no companion assets to assemble. This page is the general one: it opens the same workspace and the same Screenshot panel, but is written for the wider format list including CAD, point clouds and archives.
Can I capture a model with a transparent background?
Yes. Choose Transparent in the Screenshot panel and export as PNG. JPEG has no alpha channel, so transparency is only available with PNG output.
Why did my OBJ load with no material?
OBJ geometry and its appearance are separate: geometry in the .obj, appearance in a .mtl file which in turn points at texture images. Selecting only the .obj gives you geometry with the default material. Zip the .obj, the .mtl and the textures together and upload that instead.
Can I capture a STEP file?
Yes, and it is worth knowing what you are capturing. STEP is a CAD solid-modelling format, so GLBKit tessellates it into triangles when loading. The capture shows the tessellated mesh, not the original B-Rep surfaces — curved edges will be faceted to whatever resolution the tessellation used.
What resolution should I choose?
Match it to the destination. 1280 × 720 (HD) is enough for an embedded image or a documentation page, 1920 × 1080 (Full HD) covers most presentations, and 3840 × 2160 (4K) is for large displays or images you intend to crop. Exporting larger than you need only costs file size, since the capture takes what the viewport already resolved.
Why does my point cloud capture look like sparse dots?
That is what the file contains. Point clouds store positions and attributes rather than surfaces, so they render as discrete points. Zooming in helps you judge the distribution — and the Analyzer panel reports the point count if you need a number rather than an impression.
Does capturing a screenshot upload my model?
No. The image is rendered from the canvas in your browser and downloaded directly.
Is there a file size limit?
Yes. Uploads are capped at 150 MB, and the limit is shown on the drop zone so an oversized file is rejected before parsing rather than after.
Why is my captured image missing part of the model?
Usually framing rather than rendering. The capture takes exactly what the viewport shows, so if you have zoomed in or panned, the export matches that. Click Recenter Camera, then set the zoom deliberately rather than dragging the model out of frame.
Related guides
Open the 3D Model Screenshot tool
It opens the workspace with the Screenshot panel ready, and accepts any of the 25 formats GLBKit supports, up to 150 MB.