How to Use a 3D Model Viewer: Complete Guide to Viewing 3D Files Online
Learn how to upload, inspect, view, and capture screenshots of 3D files online using GLBKit. This guide covers supported formats, viewer controls, and practical workflows for developers, designers, CAD users, and 3D artists.
Introduction
A 3D model viewer is a tool that lets you open, inspect, and interact with three-dimensional files directly in a web browser. Instead of launching heavy desktop applications, you can drag a file into a browser tab and immediately examine the geometry, materials, textures, and scene structure. This is useful for quickly verifying assets before production, checking file integrity, previewing work from collaborators, or simply inspecting a 3D file without installing additional software.
Browser-based viewers have become essential for teams that need to share feedback on 3D assets, for students learning 3D workflows, and for developers who need to validate models before integrating them into WebGL applications. GLBKit provides a browser-based toolkit for viewing and inspecting 3D assets. You can open supported 3D files, inspect their contents, adjust camera and display settings, and capture screenshots without installing desktop software or creating an account. If you want to start quickly, open the 3D Model Viewer to begin.
What Is GLBKit?
GLBKit is a browser-based toolkit for viewing and inspecting 3D assets. It handles the entire workflow locally in your browser: you upload a model, inspect it from any angle, adjust viewer controls such as camera, materials, background, lights, and environment, and capture screenshots when needed.
Because everything runs in the browser, there is no desktop installation required. Files are processed locally whenever possible, which means you do not need to upload them to a server. GLBKit supports a wide range of formats, from common web formats like GLB and GLTF to CAD files, point clouds, and 3D printing formats, making it useful for developers, designers, product teams, and anyone who needs to open a 3D file quickly.
Quick Answers
What is a 3D model viewer?
A 3D model viewer is an online tool that lets you open, preview, and inspect 3D files directly in a web browser. GLBKit supports GLB, GLTF, OBJ, STL, PLY, FBX, STEP, USD, and other formats, letting you examine geometry, materials, and textures without installing desktop software.
How do I view a 3D model online?
Go to GLBKit, drag and drop a supported 3D file onto the viewer, or click Browse Files to select one from your device. The model loads automatically in the browser, and you can rotate, zoom, and pan to inspect it.
How do I view a GLB file?
Open the GLB Viewer on GLBKit, drag and drop your .glb file, or click Browse Files to select it. The file loads as a single self-contained package, so no external assets are required. You can inspect geometry, materials, textures, and animations directly in the browser.
How do I view a GLTF file?
Open the GLTF Viewer on GLBKit and upload your .gltf file. If the model references external .bin or texture files, make sure those files are available alongside the main .gltf file so the viewer can resolve them.
Can I view OBJ files online?
Yes. Use the OBJ Viewer on GLBKit to open .obj files directly in your browser. OBJ geometry is reliable, but materials usually come from a separate .mtl file, so make sure that file is present for the full appearance.
Can I view FBX files online?
Yes. GLBKit supports FBX files for browser-based viewing. Open the FBX Viewer to inspect meshes, materials, textures, animations, bones, and cameras. Complex FBX scenes may take longer to load than simpler formats.
Can I view STL files online?
Yes. Use the STL Viewer to open .stl files directly in your browser. STL stores only surface geometry as triangles, so you can inspect mesh quality, check for holes, and verify print readiness before sending the file to a slicer or 3D printer.
Can I view PLY files online?
Yes. GLBKit supports PLY files for viewing polygon and point-cloud data in the browser. Open the PLY Viewer to inspect point distributions, surface detail, color, and normals. Performance depends on the number of points in the file.
Can I view USD files online?
Yes. GLBKit supports USD, USDA, and USDC files. Open the USD Viewer to inspect scene composition, references, layering, and complex hierarchies. USDA is human-readable text, while USDC is a compact binary format.
What is the difference between GLB and GLTF?
GLB is the binary version of glTF and stores geometry, materials, textures, animations, and scene data in a single file. GLTF is the JSON version that references separate buffers and textures. GLB is better for web deployment and sharing; GLTF is easier to edit and version-control during development.
What 3D formats does GLBKit support?
GLBKit supports GLB, GLTF, OBJ, FBX, STL, 3MF, PLY, PCD, LAS, LAZ, STEP, USD, USDA, USDC, and ZIP archives. You can open these files directly in the browser without installing software.
Do I need to install software to view a 3D model?
No. GLBKit runs entirely in your browser. You do not need to install plugins, desktop software, or create an account to view 3D models. Files are processed locally whenever possible.
How do I inspect a 3D model?
After uploading, use the mouse or touch controls to orbit, zoom, and pan. Open the Info panel to review meshes, materials, textures, vertices, triangles, and scene hierarchy. Switch to wireframe mode to inspect mesh topology, and use the Material panel to verify PBR setups.
How do I take a screenshot of a 3D model?
Open the Screenshot panel, choose an image format (PNG or JPEG), resolution (HD, Full HD, or 4K), and background style (Transparent, White, or Black). Click Capture Screenshot, then Download Image to save the result. For more advanced workflows, use the dedicated GLB Screenshot Tool, GLTF Screenshot Tool, or 3D Model Screenshot Tool.
How to Use GLBKit
The basic workflow follows a simple path from upload to inspection:
- Upload a 3D file — Drag and drop a supported file or browse your device.
- Model loads in the viewer — The file is processed and rendered automatically in the browser.
- Inspect the model — Rotate, zoom, and pan to examine geometry, materials, and textures.
- Adjust viewer controls — Switch display modes, change backgrounds, adjust lighting, and configure camera settings.
- Inspect model information — Review file name, size, format, and other details.
- Capture a screenshot — Export an image of the current view for documentation or sharing.
Upload Your 3D Model
Uploading is straightforward. You can drag and drop a supported 3D file directly onto the viewer, or click Browse Files to select a file from your device. The browser-based workflow means the file stays on your machine during the entire process.
GLBKit supports a broad range of extensions across multiple categories, including GLB, GLTF, OBJ, FBX, STL, PLY, 3MF, PCD, LAS, LAZ, STEP, USD, USDA, USDC, and ZIP archives. Once a file is selected, it loads automatically into the interactive 3D viewport. If you need a dedicated viewer for a specific format, you can also open the GLB Viewer, GLTF Viewer, OBJ Viewer, FBX Viewer, STL Viewer, or PLY Viewer directly.
What Happens After Upload?
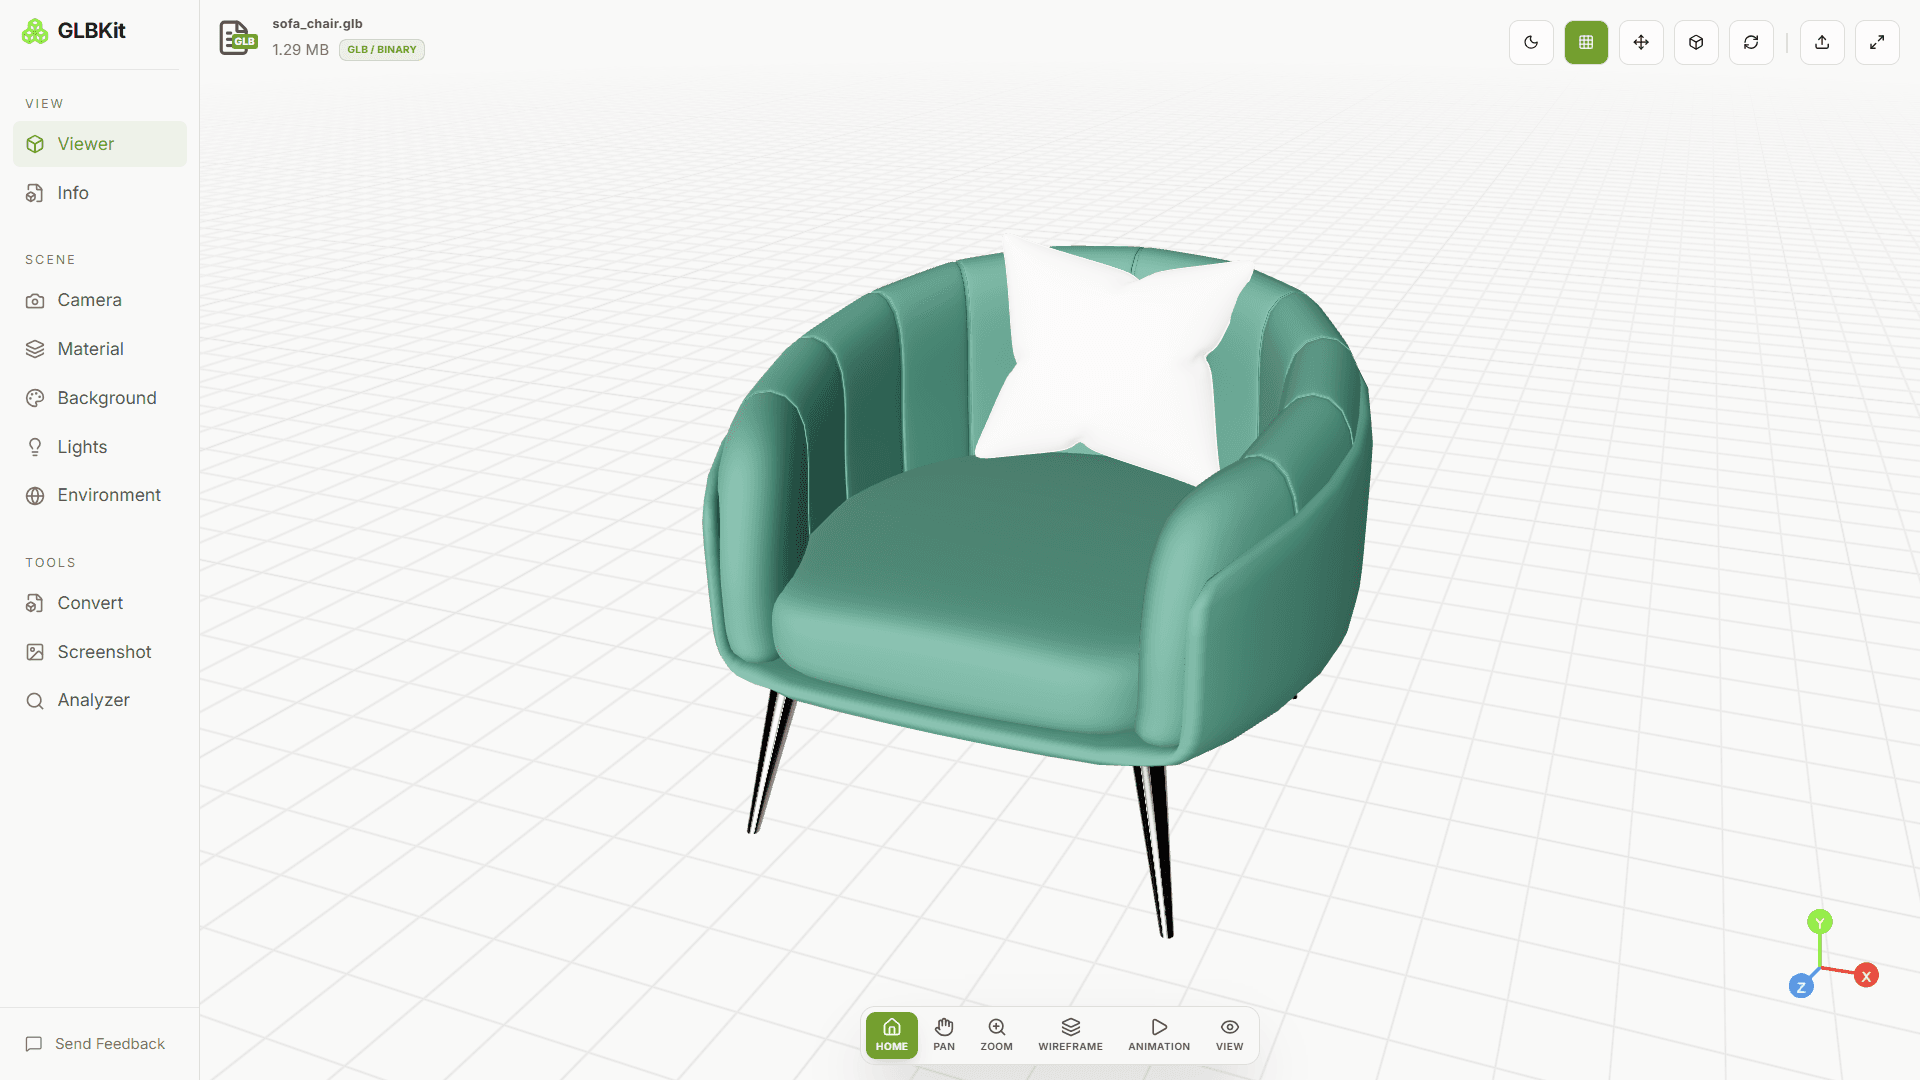
After you select a file, it loads into the viewer workspace. The interface transitions from the upload area to the interactive 3D viewport. The model appears centered in the canvas, and you can immediately begin rotating, zooming, and panning. The information panel displays the file name, size, and format so you can confirm what you are working with.
From there, you have access to display modes, camera controls, background options, and screenshot tools. If you need to switch to a different file, you can upload a new model without leaving the page. The unified 3D Model Viewer handles all supported formats in one workspace, while dedicated viewers like the GLB Screenshot Tool and GLTF Screenshot Tool provide specialized workflows for capturing and exporting images.
Step-by-Step: How to View a 3D Model Online
If you have never used GLBKit before, the following walkthrough covers a typical first session from opening the page to exporting a screenshot. Each step maps directly to the tools available in the browser workspace.
01 Upload your 3D file
Go to the 3D Model Viewer or any format-specific viewer. Drag and drop a supported file onto the upload area, or click Browse Files to choose one from your device. The file is processed locally in the browser, so nothing is uploaded to a remote server during this step.
02 Let the model load
After you select a file, GLBKit parses it and renders the model in the central viewport. Larger files or complex scenes may take a moment to process. Once loaded, the model appears centered on the canvas and the information panel shows the file name, size, and format.
03 Explore the viewport
Use the mouse or touch controls to orbit around the model, zoom in on details, and pan across the scene. The top toolbar lets you toggle the grid, axis gizmos, bounding box, and fullscreen mode. The bottom toolbar lets you switch between home, pan, zoom, wireframe, animation, and preset camera views. These controls are the fastest way to get a feel for the asset.
04 Adjust the camera
Open the Camera panel from the sidebar. You can switch between perspective and orthographic projection, choose preset views such as Front, Back, Top, Bottom, Left, Right, and Isometric, and adjust field of view and zoom. Use these controls when you need precise framing or a consistent viewpoint for screenshots.
05 Inspect materials
Open the Material panel to see every material on the model. Select a material from the list, then adjust base color, metalness, roughness, and opacity. This is useful for verifying PBR setups, debugging missing textures, or demonstrating material variations without leaving the browser.
06 Adjust background
Open the Background panel to change the backdrop. You can pick a solid color with presets such as Studio, Black, Slate, and Light; create a gradient with two colors and an angle; or upload a custom image and adjust blur. An opacity slider is available for all modes. A clean or contrasting background helps you evaluate materials and reflections more accurately.
07 Adjust lighting
Open the Lights panel to control the main key light. Toggle it on or off, choose a light type (Key, Fill, or Rim), adjust intensity, change color, and move the light along the X, Y, and Z axes. You can also enable shadows. Changing the light position or color makes it easier to spot issues with normals, material assignments, and texture alignment.
08 Explore environment settings
Open the Environment panel to add an environment map. Presets include Studio, Warehouse, Sunset, and Outdoor. You can adjust intensity and rotation to control how much the environment contributes to the scene. Environment maps are especially useful for metallic or glossy surfaces because they provide realistic reflections.
09 Inspect model information
Open the Info panel to review file details and model statistics. The top section shows the file name, format, and size. Below that, collapsible sections list meshes, geometries, materials, textures, vertices, triangles, draw calls, animations, and the scene hierarchy. Use this panel to validate asset complexity and confirm that everything loaded as expected.
10 Capture a screenshot
Open the Screenshot panel to export the current view. Choose an image format (PNG or JPEG), resolution (HD, Full HD, or 4K), and background style (Transparent, White, or Black). Click Capture Screenshot, then Download Image to save the result. The preview area shows the latest capture so you can verify composition before downloading. For more advanced capture workflows, you can also use the dedicated GLB Screenshot Tool, GLTF Screenshot Tool, or 3D Model Screenshot Tool.
How to Choose the Right Viewer
GLBKit offers both a unified workspace and format-specific viewers. The unified 3D Model Viewer handles every supported format in one place, which is convenient when you work with mixed file types or want a single familiar interface. However, some users prefer dedicated viewers that are pre-configured for a specific format.
Choose a dedicated viewer when you want a streamlined experience focused on one format. For example, open the GLB Viewer when your primary workflow involves binary glTF files, or the GLTF Viewer when you need to inspect external assets referenced by a .gltf file. Use the OBJ Viewer for Wavefront geometry checks, the FBX Viewer for animated scenes and rigging, the STL Viewer for 3D print preparation, and the PLY Viewer for point cloud inspection. If you are unsure which format you have, start with the 3D Model Viewer; it accepts all supported files.
Understanding the GLBKit Viewer Workspace
Once a model is loaded, the workspace gives you access to several tools arranged around the 3D viewport. The left sidebar contains tabs for Camera, Material, Background, Lights, Environment, Info, and Screenshot. The viewport itself includes top and bottom toolbar buttons for quick actions such as toggling the grid, resetting the camera, switching display modes, and entering fullscreen. Below is what each workspace tool does and when you might use it.
Viewer
What is it? The central 3D viewport where your model is rendered. It includes top toolbar buttons for grid, gizmos, bounding box, camera reset, upload, and fullscreen, plus bottom toolbar buttons for home, pan, zoom, wireframe, animation toggle, and preset camera views.
What can I use it for? Interacting with the loaded model directly. You can orbit, zoom, and pan with mouse or touch controls, toggle wireframe mode to inspect mesh topology, or enable auto-rotation to spin the model continuously.
When would I use it? Anytime you need a quick look at the asset, check overall proportions, or verify that the file loaded correctly before diving into specific panels.
Camera
What is it? A side panel for controlling the virtual camera. You can switch between perspective and orthographic projection, choose preset views such as Front, Back, Top, Bottom, Left, Right, and Isometric, and adjust field of view and zoom.
What can I use it for? Framing the model exactly how you want to see it. Perspective mode gives a natural sense of depth, while orthographic mode removes perspective distortion for precise dimensional inspection.
When would I use it? When you need consistent framing for screenshots, when comparing model scale without perspective distortion, or when you want to quickly jump to a standard orthographic view.
Material
What is it? A panel that lists every material on the loaded model and lets you edit base color, metalness, roughness, and opacity. Selecting a material from the list highlights it for editing, and a reset button restores the original values.
What can I use it for? Inspecting how materials are assigned across the model and tweaking their appearance in real time. You can see how metalness and roughness affect reflections, or verify that the base color matches the intended design.
When would you use it? When validating PBR material setups, debugging missing textures, or demonstrating material variations directly in the browser without opening a 3D application.
Background
What is it? A panel that controls the viewer background. It supports solid colors, gradients, and custom images. Solid mode includes preset swatches such as Studio, Black, Slate, and Light. Gradient mode lets you pick two colors and an angle. Image mode lets you upload a background picture and adjust blur. An opacity slider is available for all modes.
What can I use it for? Changing the backdrop to evaluate how materials and lighting interact with different environments, or to prepare a clean background for screenshots.
When would you use it? When checking material reflections against different backdrop tones, when creating presentation-ready views, or when a neutral background helps you focus on the model geometry.
Lights
What is it? A panel that controls a single key light with on/off toggle, light type selection (Key, Fill, or Rim), intensity slider, color picker, position sliders for X, Y, and Z, and a shadows toggle.
What can I use it for? Adjusting the main illumination on the model. Changing the light position or color lets you see how shadows and highlights fall across surfaces, which is useful for spotting normal issues or flat material areas.
When would you use it? When inspecting surface detail, verifying that materials react correctly to light, or simulating a simple studio lighting setup before capturing a screenshot.
Environment
What is it? A panel that controls the scene environment map. It includes an on/off toggle, preset environments such as Studio, Warehouse, Sunset, and Outdoor, plus sliders for intensity and rotation.
What can I use it for? Adding realistic reflections and ambient lighting to the model. Environment maps are especially useful for metallic or glossy surfaces because they provide the reflections that make those materials look believable.
When would you use it? When evaluating PBR materials under real-world lighting conditions, when comparing how different environments affect reflections, or when preparing a final render-style view for screenshots.
Info / Model Information
What is it? A panel that displays file details and model statistics. It shows the file name, format, and size at the top, followed by collapsible sections for model statistics (meshes, geometries, materials, textures, vertices, triangles, draw calls, animations), meshes list, materials list, textures list with type chips, animations list, and scene hierarchy tree.
What can I use it for? Understanding what is actually inside the file. You can see how many meshes and materials are present, inspect texture types, review animation clip counts, and browse the scene hierarchy to confirm node structure.
When would you use it? When validating an asset before production, when debugging missing or extra geometry, or when you need a quick summary of model complexity without opening external tools.
Screenshot
What is it? A panel for capturing and exporting images of the current view. It offers image format selection (PNG or JPEG), resolution options (HD, Full HD, 4K), background style choices (Transparent, White, Black), a capture button, a download button, and a preview area showing the latest screenshot.
What can I use it for? Creating high-resolution exports of your model for documentation, presentations, portfolios, or sharing. The panel supports transparent backgrounds for PNG, making it easy to produce cutout-ready images.
When would you use it? When you need a still image of the current view, when preparing marketing assets, or when exporting previews for teammates who do not have 3D software. For more advanced screenshot workflows, you can also use the dedicated GLB Screenshot Tool, GLTF Screenshot Tool, or 3D Model Screenshot Tool.
Supported 3D File Formats
GLBKit supports a wide range of 3D file formats. The table below groups them by category. Note that not every format supports the same features; for example, some formats carry animations and materials while others store geometry only.
| Format | Category | Typical Use |
|---|---|---|
| GLB | 3D Model | Web deployment, real-time apps, AR/VR |
| GLTF | 3D Model | Development, asset editing, web delivery |
| OBJ | 3D Model | Geometry exchange, broad software compatibility |
| FBX | 3D Model | Animation, game engines, VFX pipelines |
| STL | 3D Printing / Manufacturing | 3D printing, rapid prototyping |
| 3MF | 3D Printing / Manufacturing | Modern 3D printing with color and metadata |
| PLY | Point Cloud | 3D scanning, scientific visualization |
| PCD | Point Cloud | LiDAR, robotics, point cloud processing |
| LAS | Point Cloud | Aerial surveying, GIS, mapping |
| LAZ | Point Cloud | Compressed LiDAR point clouds |
| STEP | CAD / Engineering | CAD exchange, manufacturing, engineering |
| USD | Scene / Production | VFX, animation, collaborative pipelines |
| USDA | Scene / Production | Human-readable USD scene data |
| USDC | Scene / Production | Binary USD scene data |
| ZIP | 3D Asset Packages | Bundled assets, textures, and resources |
Below is a practical overview of each format family, what it is used for, and what you should know before opening it in the browser viewer.
3D Models
These formats are the most common for web, game, and real-time 3D workflows. They differ in how they store geometry, materials, textures, and animation data.
| Format | What it is | Typical use | What to know before viewing |
|---|---|---|---|
| GLB | Binary glTF: geometry, materials, textures, animations, cameras, and scene data in one file. | Websites, Three.js, React Three Fiber, product visualization, AR. | Self-contained package; external assets are not required. |
| GLTF | JSON glTF: references separate buffers and textures instead of packaging them. | Development, asset editing, version control, web delivery. | May require external .bin and texture files alongside the .gltf file. |
| OBJ | Wavefront geometry format storing mesh data in simple text. | Broad 3D software compatibility, geometry exchange, scanning. | Materials usually come from a separate .mtl file; geometry is reliable, materials may not load without it. |
| FBX | Autodesk format for meshes, materials, textures, animations, bones, and cameras. | Game engines, VFX pipelines, animation interchange. | Proprietary format; complex scenes may take longer to load in the browser. |
GLB is the most web-friendly format because everything is packed into one file. If you need to view a GLB online, open the GLB Viewer for the fastest experience. GLTF is better during active development because assets can be swapped independently. You can view GLTF online with the GLTF Viewer. OBJ is a safe fallback when exchanging geometry between tools. Use the OBJ Viewer to inspect it. FBX is useful when you need to inspect animated scenes or check rigging data. The FBX Viewer lets you open it directly.
3D Printing / Manufacturing
These formats are designed for additive manufacturing and 3D printing workflows. They focus on geometry and physical material properties rather than real-time rendering.
| Format | What it is | Typical use | What to know before viewing |
|---|---|---|---|
| STL | Stereolithography format describing surface geometry as triangles. | 3D printing, rapid prototyping, slicer input. | No color, texture, or material data; useful for checking mesh quality and print readiness. |
| 3MF | Modern XML-based package storing geometry, color, materials, metadata, and print settings. | Modern 3D printing services, slicers with material profiles. | Richer than STL but not all slicers support every feature. |
STL remains the most common format for 3D printing because every slicer accepts it. Use the STL Viewer to inspect mesh quality, check for holes, and verify print readiness before sending a file to a printer. 3MF is gaining adoption because it stores more than just triangles. You can view 3MF files online to inspect color and metadata without opening dedicated manufacturing software.
Point Cloud
Point cloud formats store collections of 3D points rather than connected triangle meshes. They are commonly used in 3D scanning, LiDAR, robotics, and scientific visualization.
| Format | What it is | Typical use | What to know before viewing |
|---|---|---|---|
| PLY | Polygon File Format storing vertices and optional polygon meshes with properties like color and normals. | 3D scanning, research, computer vision. | Can describe meshes or raw points; performance depends on point count. |
| PCD | Point Cloud Data format associated with PCL and ROS. | Robotics, autonomous vehicles, 3D perception research. | Optimized for processing pipelines; viewing is mainly for inspection. |
| LAS | Standard LiDAR point cloud format with classification and intensity. | Aerial surveying, GIS, mapping, forestry. | Files can be large; the viewer renders the decompressed point data directly. |
| LAZ | Compressed version of LAS using lossless compression. | Large aerial or terrestrial LiDAR surveys. | Smaller file size than LAS; viewer handles decompression automatically. |
PLY files are common in research and scanning. Use the PLY Viewer to inspect point distributions and surface detail. PCD is less common outside robotics but useful when working with ROS or PCL pipelines. LAS and LAZ are the standard formats for LiDAR surveys. You can view LAS online or view LAZ online to quickly check point density, scan coverage, and classification without specialized desktop software.
CAD / Engineering
CAD formats store precise engineering geometry, assemblies, and metadata for manufacturing and design exchange.
| Format | What it is | Typical use | What to know before viewing |
|---|---|---|---|
| STEP | ISO-standard format for exchanging 3D product and manufacturing data. | CAD exchange, manufacturing, engineering collaboration. | Can contain complex curved surfaces and assemblies; loading may take longer than mesh-based formats. |
STEP files are widely used in engineering because they preserve exact geometry and metadata across different CAD systems. You can view STEP files online to inspect CAD geometry, verify dimensions, and check model structure before sending them to a manufacturing partner or importing them into another tool.
Scene / Production
USD is a framework developed by Pixar for interchange between 3D tools and for collaborative scene assembly. It is widely adopted in VFX, animation, and real-time production pipelines.
| Format | What it is | Typical use | What to know before viewing |
|---|---|---|---|
| USD | Universal Scene Description system referencing multiple files or packaged archives. | VFX, animation, collaborative pipelines. | Can reference external assets; loading depends on referenced files. |
| USDA | ASCII (human-readable) USD scene data. | Development, debugging, version control. | Text format is larger but easier to inspect and diff. |
| USDC | Binary USD scene data. | Production delivery, final scene packaging. | Compact and fast to load; same scene data as USDA. |
USD is designed for large collaborative projects where multiple artists work on different parts of a scene. It supports layering, references, variants, and complex hierarchies. USDA is useful when you need to read or debug the scene structure directly. USDC is the production-ready binary version. You can view USD files online to inspect scene composition, check references, and verify that assets load correctly.
3D Asset Packages
ZIP is not a 3D format itself, but it is commonly used to bundle 3D assets together for sharing and distribution.
| Format | What it is | Typical use | What to know before viewing |
|---|---|---|---|
| ZIP | Archive containing a 3D file and its referenced assets such as textures, materials, and binary buffers. | Bundling GLTF assets, sharing complete 3D packages. | The viewer extracts the archive in the browser and loads the root 3D file automatically. |
A ZIP archive can contain a GLTF file along with its referenced textures, materials, binary buffers, and other resources. When you open a ZIP file in GLBKit, the viewer extracts the contents in the browser and loads the root 3D file automatically, resolving any internal references. This makes ZIP a convenient way to share complete 3D assets that would otherwise require multiple files.
Inspecting and Adjusting Your Model
Once a model is loaded, you have several options for inspecting it and adjusting the view. The goal is to let you examine the asset from every angle and under different conditions before deciding whether it is ready for production.
Camera and Navigation
Use the mouse or touch controls to orbit around the model, zoom in on details, and pan across the scene. You can also reset the camera to return to the default framing if the view becomes difficult to navigate.
Display Modes
Switch between orbit, wireframe, and solid display modes. Wireframe mode is useful for inspecting mesh topology and geometry structure. Solid mode shows the model with its materials and textures for a realistic preview.
Background and Environment
Change the background color or use an environment map to see how the model reacts under different lighting conditions. This helps you evaluate materials, reflections, and overall appearance.
Lighting
Adjust lighting settings to highlight specific parts of the model or to simulate different studio environments. Proper lighting makes it easier to spot issues with normals, material assignments, and texture alignment.
Screenshots
When you need to document or share a specific view, you can capture a screenshot directly from the browser. The GLB Screenshot Tool and 3D Model Screenshot Tool provide options for custom resolution, background styles, and image format. Use the GLTF Screenshot Tool when working with GLTF assets.
Tips for Working with 3D Files Online
- Verify before production — Open your model in the viewer to confirm geometry, materials, and textures before exporting or integrating it into a project.
- Use wireframe mode — Switch to wireframe to inspect mesh topology, check for non-manifold edges, and understand the underlying structure.
- Check material assignments — Use solid mode to verify that materials and textures are applied correctly and that UV mappings look right.
- Capture multiple angles — Take screenshots from front, side, top, and isometric views for complete documentation.
- Review file information — Check the file name, size, and format in the information panel to make sure you are working with the intended asset.
- Use ZIP for bundled assets — If your model relies on external textures or reference files, package them in a ZIP archive for easier sharing and loading.
- Compare formats before choosing — If you are deciding between file formats, read the GLB vs GLTF and GLB vs OBJ guides to understand the tradeoffs.
- Learn format-specific workflows — For format-specific tips, see the How to Use GLB Viewer guide or the How to Take GLB Screenshots guide.
Frequently Asked Questions
What is a 3D model viewer?
A 3D model viewer is an online tool that lets you open, preview, and inspect 3D files directly in a web browser. GLBKit supports GLB, GLTF, OBJ, STL, PLY, FBX, STEP, USD, and other formats, letting you examine geometry, materials, and textures without installing desktop software.
How can I view a 3D model without installing software?
Go to GLBKit and drag and drop a supported 3D file onto the viewer, or click Browse Files to select one from your device. The model loads automatically in the browser, and you can rotate, zoom, and pan to inspect it. No plugins, desktop software, or account creation are required.
How do I open a GLB file?
Open the GLB Viewer on GLBKit, drag and drop your .glb file, or click Browse Files to select it. The file loads as a single self-contained package, so no external assets are required. You can inspect geometry, materials, textures, and animations directly in the browser.
How do I open a GLTF file?
Open the GLTF Viewer on GLBKit and upload your .gltf file. If the model references external .bin or texture files, make sure those files are available alongside the main .gltf file so the viewer can resolve them.
Can I view OBJ files in a browser?
Yes. Use the OBJ Viewer on GLBKit to open .obj files directly in your browser. OBJ geometry is reliable, but materials usually come from a separate .mtl file, so make sure that file is present for the full appearance.
Can I view FBX files online?
Yes. GLBKit supports FBX files for browser-based viewing. Open the FBX Viewer to inspect meshes, materials, textures, animations, bones, and cameras. Complex FBX scenes may take longer to load than simpler formats.
Can I view STL files online?
Yes. Use the STL Viewer to open .stl files directly in your browser. STL stores only surface geometry as triangles, so you can inspect mesh quality, check for holes, and verify print readiness before sending the file to a slicer or 3D printer.
Can I view PLY files online?
Yes. GLBKit supports PLY files for viewing polygon and point-cloud data in the browser. Open the PLY Viewer to inspect point distributions, surface detail, color, and normals. Performance depends on the number of points in the file.
Can I view USD files online?
Yes. GLBKit supports USD, USDA, and USDC files. Open the USD Viewer to inspect scene composition, references, layering, and complex hierarchies. USDA is human-readable text, while USDC is a compact binary format.
What is GLB used for?
GLB is the binary version of glTF, designed for web deployment, real-time applications, AR/VR, and product visualization. It packages geometry, materials, textures, animations, cameras, and scene data into a single file, making it easy to upload, share, and deploy.
What is GLTF used for?
GLTF is the JSON version of the glTF specification. It is commonly used during development, asset editing, version control, and web delivery. Because GLTF references separate buffers and textures, it is easier to edit and manage than GLB when you need to swap assets or track changes.
What is the difference between GLB and GLTF?
GLB is the binary version of glTF and stores geometry, materials, textures, animations, and scene data in a single file. GLTF is the JSON version that references separate buffers and textures. GLB is better for web deployment and sharing; GLTF is easier to edit and version-control during development.
Which 3D formats does GLBKit support?
GLBKit supports GLB, GLTF, OBJ, FBX, STL, 3MF, PLY, PCD, LAS, LAZ, STEP, USD, USDA, USDC, and ZIP archives. You can open these files directly in the browser without installing software.
Can I inspect model information?
Yes. Open the Info panel to review file details and model statistics, including meshes, geometries, materials, textures, vertices, triangles, draw calls, animations, and the scene hierarchy. Use this panel to validate asset complexity and confirm that everything loaded as expected.
Can I adjust lighting?
Yes. Open the Lights panel to control the main key light. You can toggle it on or off, choose a light type (Key, Fill, or Rim), adjust intensity, change color, and move the light along the X, Y, and Z axes. You can also enable shadows.
Can I change the background?
Yes. Open the Background panel to choose a solid color with presets such as Studio, Black, Slate, and Light; create a gradient with two colors and an angle; or upload a custom image and adjust blur. An opacity slider is available for all modes.
Can I change the camera view?
Yes. Open the Camera panel to switch between perspective and orthographic projection, choose preset views such as Front, Back, Top, Bottom, Left, Right, and Isometric, and adjust field of view and zoom. You can also use the viewport controls to orbit, zoom, and pan.
Can I capture a 3D model screenshot?
Yes. Open the Screenshot panel, choose an image format (PNG or JPEG), resolution (HD, Full HD, or 4K), and background style (Transparent, White, or Black). Click Capture Screenshot, then Download Image to save the result. For more advanced workflows, use the dedicated GLB Screenshot Tool, GLTF Screenshot Tool, or 3D Model Screenshot Tool.
Do I need to install a desktop 3D viewer?
No. GLBKit runs entirely in your browser. You do not need to install plugins, desktop software, or create an account to view 3D models. Files are processed locally whenever possible.
Troubleshooting
If you run into issues while using GLBKit, the following tips may help. These cover common scenarios based on how the viewer works.
Unsupported file format
If the viewer does not accept your file, check that the extension is one of the supported formats: GLB, GLTF, OBJ, FBX, STL, 3MF, PLY, PCD, LAS, LAZ, STEP, USD, USDA, USDC, or ZIP. If the format is supported but the file still fails, the file may be corrupted or use features not handled by the browser-based loader.
Very large model
Large models with many polygons, high-resolution textures, or dense point clouds may take longer to load and can affect viewport performance. If the model is very large, try closing other browser tabs, ensuring your graphics drivers are up to date, and using a modern browser such as Chrome, Edge, Firefox, or Safari.
Missing external assets
Formats such as GLTF, OBJ, and USD can reference external files. If your model appears incomplete, make sure all referenced buffers, textures, .mtl files, and other assets are present in the same folder or included in the same ZIP archive. Missing references are a common cause of incomplete rendering.
Model taking time to load
Complex scenes, CAD files, point clouds, and ZIP archives can take longer to process because the browser must parse and decompress the data. If the viewer seems stuck, wait a few moments for large files. If the model never finishes loading, try a smaller file or a different browser.
Model appearance changing with lighting or environment
The viewer includes adjustable lights and environment maps, which are meant to help you inspect materials and geometry under different conditions. If the model looks different than expected, try switching display modes, toggling the environment panel, or using a neutral background to isolate the model from external lighting influences.
Related Guides
If you found this guide useful, you may also want to explore these related resources:
- GLB vs GLTF — Understand the differences between binary and JSON glTF formats.
- GLB vs OBJ — Compare geometry, materials, textures, and compatibility.
- How to Use GLB Viewer — Step-by-step instructions for the dedicated GLB Viewer.
- How to Take GLB Screenshots — Learn to capture high-resolution screenshots of GLB models.
Open the 3D Model Viewer
Ready to inspect your model? Launch the 3D Model Viewer and start exploring supported 3D files directly in your browser with real-time rendering and interactive controls.
Launch 3D Model Viewer